If you’re currently burning wood or thinking about adding a wood burning stove or fireplace to your home, this article will shed light on many chimney questions and issues that are frequently brought up in conversation. Thank you for taking time to read this. It will prove time well spent.
That special feeling created by a crackling wood fire is what special memories are made of. To keep your family safe and your heating system performing as designed, you’re wise to learn all you can about chimneys!
FIREPLACE, INSERT OR FREESTANDING STOVE
It’s a good idea to review how a fireplace works. There are different types of fireplaces and the chimney requirements will vary depending of the specific type of fireplace. Likewise, a fireplace insert is a bit different than a fireplace because it uses a stainless steel liner that’s installed in the existing fireplace chimney. Meanwhile, wood burning stoves can use an insulated chimney or a masonry chimney that is properly lined. Regardless of the type of wood burning equipment, it’s always best to size the chimney to the same diameter of the flue collar on the appliance.
BRICK CHIMNEY vs PIPE CHIMNEY
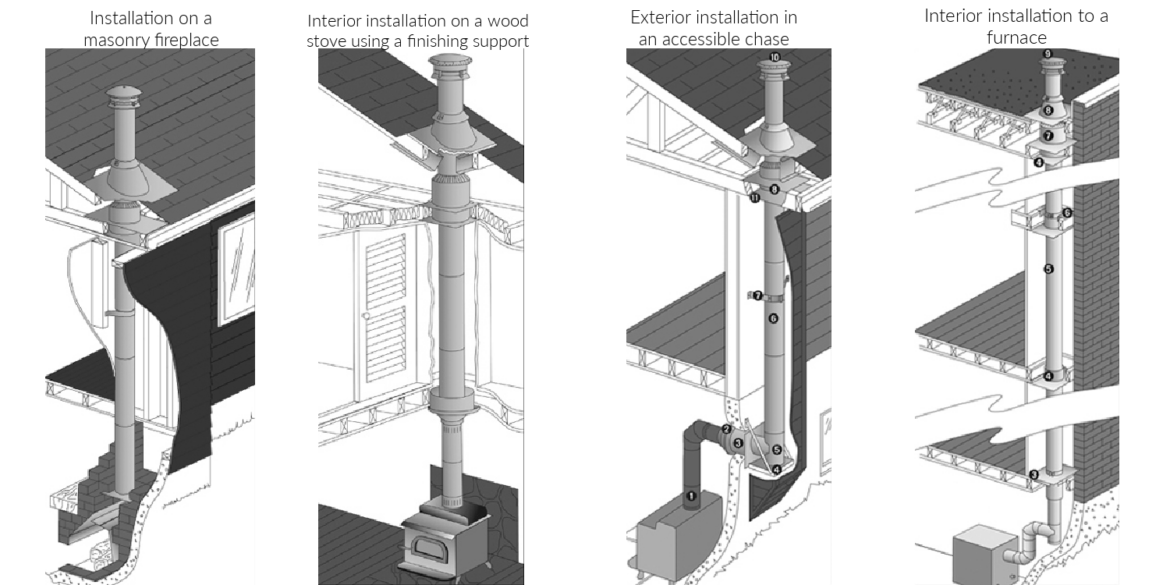
There are basically two types of materials used for chimney systems when burning wood; masonry or stainless steel. Let’s focus on masonry chimneys to begin.
Think of the exterior brick, block or stone that you typically see on a house. This ‘chimney’ is actually the housing or conduit for a chimney flue or liner. The function of a chimney flue is to simply route all the by-products of combustion out of the fireplace, stove or insert. This flue liner needs to withstand extreme temperatures in order to protect the brick, block or stone walls and the integrity of the entire chimney structure. Most masonry chimney flues are built of ceramic clay tiles.
The term chimney “pipe” could be used to describe a single wall or a double wall pipe, used for different applications. A 6” single wall stainless steel pipe is normally used to reline a large chimney when a wood burning insert is installed in a masonry or manufactured zero clearance fireplace. A “pipe” chimney could also refer to an insulated stainless steel chimney used for wood burning stoves and most high efficiency fireplaces. This insulated pipe is designed to be installed within a couple inches of combustible framing members. An “air cooled” chimney pipe features a pipe within another larger pipe. The air space between the two provides enough protection to safely install it within a few inches of combustibles. Single wall stainless steel pipes must be housed in an existing chimney or be kept at least 18” form anything that is considered combustible.
Let’s compare these types of chimneys!
CHIMNEY ANATOMY CHART
HOW DOES A CHIMNEY WORK?
It’s been described that the chimney is the engine that drives the wood burning fireplace or stove. There’s a lot of truth to that because without a proper chimney, a fireplace, stove or insert would certainly not perform as designed.
A chimney works because of a difference in air pressure inside the house where the fire is built and outside the house at the top of the chimney. Warmer air is less dense than colder air and the rising heat, known as drafting, creates air movement. As this moving hot air carries the by-products of combustion out of the house, more oxygen rich air is pulled into the firebox. This air feeds the flames as it rushes past the fire.
The effectiveness of the draft is determined by several factors, including:
- The amount of air supplied to the fire.
- The overall height of the chimney.
- The size of the chimney.
- If the chimney is clean and free of creosote buildup and/or debris.
- The size of the fireplace opening.
This basic understanding of draft is what prevents your house from filling up with smoke.
WHO INSTALLS CHIMNEYS?
Whether it’s a masonry chimney, an insulated stainless steel chimney or a flue liner in your chimney, it’s always in your best interest to have it professionally installed by a certified specialist. That way, you are assured the project is completed with all the appropriate codes and requirements being met or exceeded. Chimneys incorrectly installed are like a time bomb. You don’t know when, but at some point, there is going to be a serious problem.
Look for a company that has installers that are card carrying members of the National Fireplace Institute (NFI), the Wood Energy Technical Training (WETT) in Canada, and the Chimney Safety Institute (CSI). These are non-profit certification agencies. All require installers to pass a rigorous national exam that tests their technical knowledge of construction practices, appropriate codes and industry trade standards.
WHY DO I NEED A CHIMNEY CAP? WILL MY CHIMNEY LEAK WHEN IT RAINS?
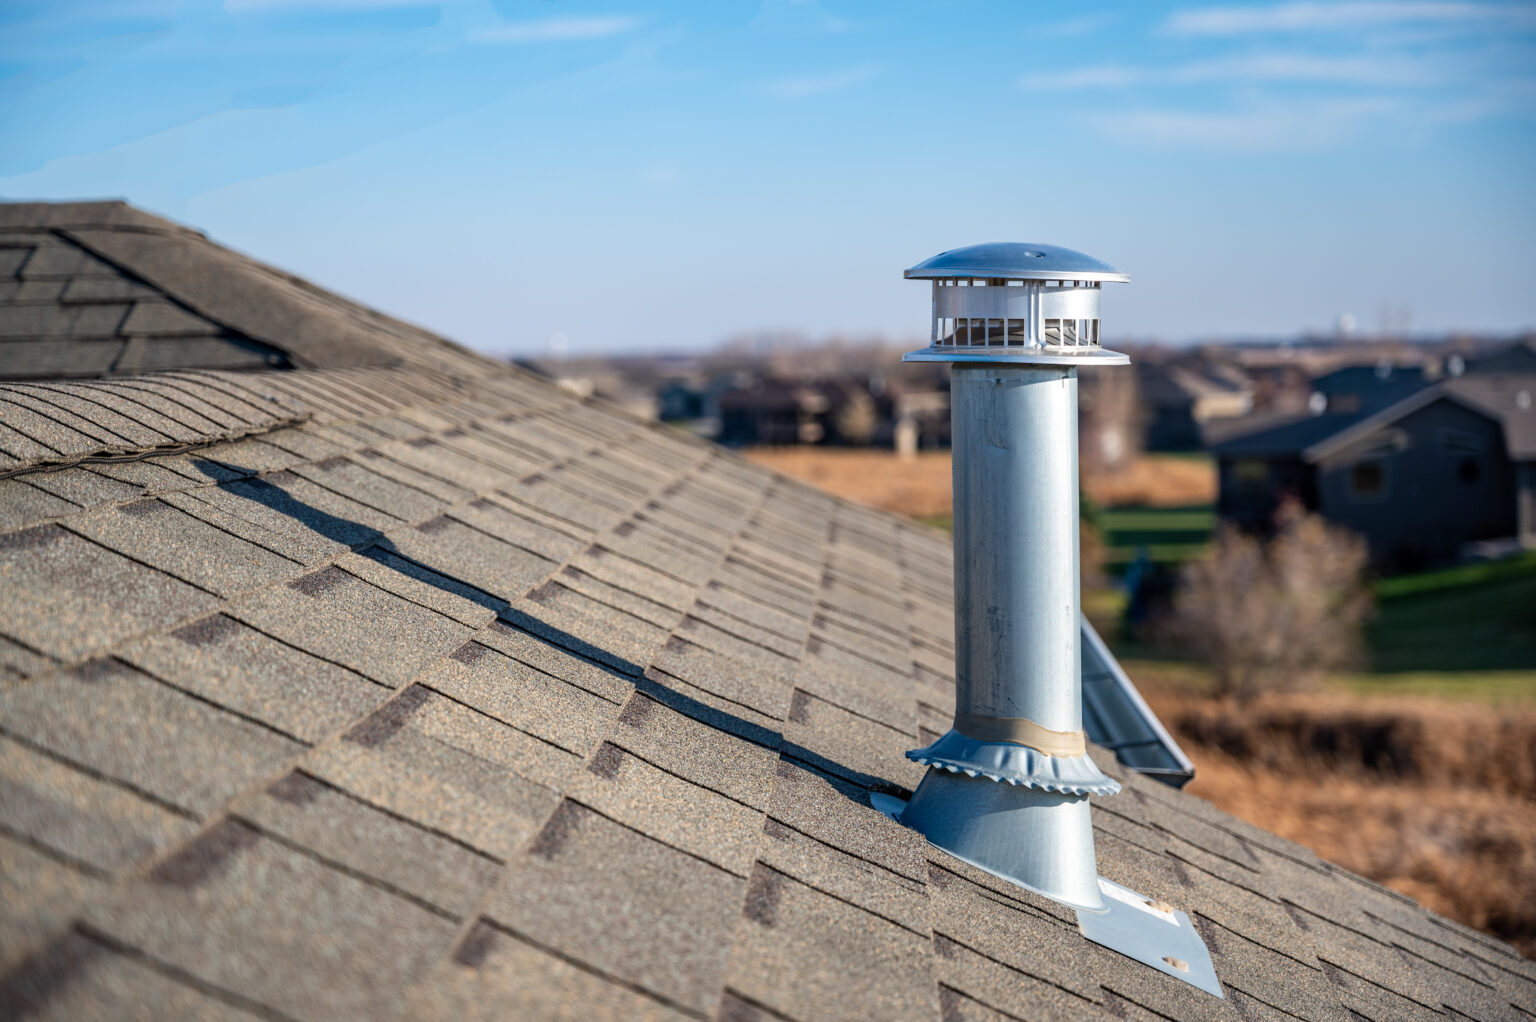
All chimneys should have the appropriate size and type of cap. There are a few reasons for this. First and foremost, a properly sized cap will keep out rain and snow. A cap will keep debris out of the chimney that would affect the draft or cause an obstruction. Caps can keep critters from nesting in the chimney. Regardless of the type of chimney or liner, a correct fitting cap can easily be removed for inspection and cleaning purposes.
Another culprit on masonry chimneys regarding leaks, could be the chimney crown. This is the very top portion of the chimney that is slightly loped to allow water to run off and away from the cap. Chimney crowns can crack, chip or corrode. These problems can allow water to flow into the chimney. Since the deterioration of a chimney is from the inside out, it’s important to know that your chimney crown and chimney cap are in good condition.
CHIMNEY AND THE ROOF LINE
Do not confuse a roof problem with a chimney leak. Whether your chimney is a stainless steel pipe or a masonry chimney, the flashing around it can cause roof leaks. A flashing diverts water away from the chimney. If a flashing is worn, bent, cracked or not correctly sealed around the chimney, water damage could occur to the roof, ceiling and walls of your home.
Masonry chimneys should have a roof feature called a “cricket” built behind the chimney. A cricket prevents water from puddling behind a masonry chimney and directs the water to run to either side of it.
Stainless steel chimneys use a round flashing that effectively diverts water around the pipe.
FOR SAFETY, HOW OFTEN DO I CLEAN MY CHIMNEY?
The National Fire Protection Association code, called NFPA 211, is for wood burning appliances and chimneys. The main purpose of this code is to remove fire hazards associated with the construction and installation of fireplaces, stoves and chimneys. NFPA 211 clearly states that a chimney is to be cleaned and inspected at least once a year. The best way to keep a chimney clean during the burning season is to store your fuel supply under cover and only burn dry wood. The best practice is to get a year ahead with your wood supply. Cut it, split it and keep the rain and snow off it for a year. And, remember to clean and inspect your chimney at least once a year.
CHIMNEY INSPECTIONS
Before a chimney can be properly inspected, it must be thoroughly cleaned. This is NOT done by banging a log chain on the sides of the chimney in an attempt to dislodge creosote! Chimney inspections and cleanings by a professional includes specialized equipment. Fiberglass rods, different types and sizes of brushes, mirrors, cameras, safety equipment and most importantly, knowing what you’re looking at are all part of a certified chimney sweep arsenal. Any legitimate chimney inspection is performed by a certified member of the Chimney Safety Institute.
WHAT KIND OF CHIMNEY DOES A GAS FIREPLACE NEED?
Gas fireplaces and free-standing gas stoves do not use a chimney. Both use a vent pipe instead. Chimneys for wood burning fireplaces, stoves and inserts are masonry or stainless steel because of the high heat from the fire. Gas appliances use a co-axial aluminum pipe. That’s just a fancy name for a smaller pipe inside a larger pipe. The smaller pipe, normally 4”, takes the byproducts of combustion out of the gas firebox. The larger pipe, typically 7”, brings combustion air into the appliance. Direct vented gas fireplaces and stoves are sealed combustion units, meaning no air from the room enters into the firebox. All air for combustion is delivered via the larger pipe on a coaxial system. Depending on installation details, aluminum coaxial venting for gas can be installed through a a sidewall or vertically through the roof. There’s a significant difference between a vent pipe and a chimney.
WHAT KIND OF CHIMNEY DOES A WOOD BURNING FIREPLACE NEED?
A chimney for a wood burning fireplace will fall into one of two categories, either masonry or stainless steel. Older open burning fireplaces will have a chimney that was put together block by block and brick by brick, typically at the time the house was built. These chimneys normally have a ceramic clay flue tile. A zero clearance fireplace will have a stainless steel chimney requirement. There are a few different types of stainless steel chimneys and the manufacturer of the fireplace will specify the exact type and brand name of the chimney approved for their model. The discussion above under “Brick vs Pipe Chimney” sheds additional light on this subject.
WHAT TYPE OF CHIMNEY DOES A PELLET STOVE NEED?
Pellet stoves do not need a chimney. They can be vented horizontally through a side wall or vertically through the roof with a specific pellet vent pipe, called “L vent”. An L vent pipe has a stainless steel inner and a galvanized steel exterior pipe and requires at least one inch of air clearance to anything combustible. To properly vent a pellet stove, follow the requirements from the manufacturer. Depending on the model, pellet stoves will require either a 3” or a 4” L vent.
A pellet insert is designed to be slid into an existing wood burning fireplace. Pellet inserts use a single wall, 3” or 4” flexible stainless steel pipe that is installed from the flue collar on top of the insert, up the existing chimney.
CAN I HAVE AN ANGLE IN MY CHIMNEY?
Any bends or angles in chimneys should be avoided if possible. An interior, straight, vertical chimney is always best at removing gases from the combustion process. It is not uncommon to offset a chimney in order to avoid a framing member. If an angle or offset is unavoidable, NFPA 211 allows for masonry and stainless steel chimney’s to be angled. It is permissible to offset a chimney either 15˚ or 30˚ and there cannot be more than four angles in the length of the chimney. 30 offsets are the most common. When figuring the overall, total chimney height, there’s a rule of thumb for the offset (and the return offset in order to get the chimney vertical again). Figure that it takes twice as much vertical distance to equal the offset distance. So, if a chimney needs to be offset 12”, you’ll need about 24” of height in order to move the chimney over 12”. Offset charts for stainless steel chimneys are available from your WE LOVE FIRE expert.
CAN A CHIMNEY CATCH ON FIRE?
Unfortunately, chimney fires are still far too common. Chimneys do not catch on fire per se. It’s more accurate to say that poor burning practices, a lack of proper maintenance and incorrect installations lead to chimney fires.
- Poor burning practices:Burn only dry wood with a moisture content less than 25%. Do not cut wood this summer or fall and expect it to be seasoned well enough to burn during the upcoming heating season. A build-up of creosote in your chimney is caused by burning wood that is too wet. This creosote is the leading cause of fires in chimneys. Again; cut it, split it and keep the rain and snow off it for a year.
- Proper maintenance:Have your chimney cleaned and inspected annually by a certified professional from the Chimney Safety Institute. Make any repairs and correct any defects that are noted in the inspection report before any additional fires are built in your fireplace or stove. If yours is a masonry clay tile lined chimney, these tiles are normally 24” in length. The lengths should have been connected with a special mortar at the time the chimney was built. However, both the mortar joints and the clay tiles can deteriorate over time because of the high flue temperatures and extreme weather conditions. Damaged or missing flue tiles can be an extremely dangerous situation if left unchecked. NFPA 211 requires every fireplace to have an approved and intact liner with no any cracks or holes. And, let’s beat the drum once more time: routine cleaning and inspections are very important.
- Incorrect installations:Clearance to anything combustible is the key to this point. Make absolute certain that all minimum required clearances are met. Better yet, remember when it comes to clearance requirements: MORE IS BETTER! Even an older house with a masonry chimney that’s been in service for years could be problematic if not properly installed.
A side note of interest: Pyrolysis is defined as a process in the thermal decomposition of materials at elevated temperatures. Pyrolysis can lead to fires in attics. Here’s how: When a masonry chimney is in contact with wood framing, that heat will significantly dry out the wood and the ignition temperature of those framing members can actually be lowered. If conditions are right, extreme heat from the chimney can transfer through the brick or block and cause the wood framing to ignite. Clearances to combustibles is critical.
CHIMNEY REPAIR & MAINTENANCE NEAR ME
If you need chimney repair services, start by checking with your closest WE LOVE FIRE dealer. Many have been providing professional inspections and repairs for dozens of years. Remember that these are family owned businesses, involved with the community and region and have earned the respect and admiration of manufacturers, industry professionals and clients like you. Look for credentials from National Fireplace Institute (NFI), the Wood Energy Technical Training (WETT) in Canada, and the Chimney Safety Institute (CSI).
WHEN IS IT TIME TO REPLACE A CHIMNEY?
Masonry chimneys are built at the time the house was originally built. As such, they would be extremely difficult to replace. Fortunately, there are a couple of chimney relining processes that will correct several code issues and restore the structural integrity to the chimney. Depending on how you’re using your fireplace, a single wall stainless steel liner may be utilized to “replace” a deteriorating chimney liner.
An insulated stainless steel chimney can be installed at the time the house was built or, added years later. A stainless steel chimney would be much easier to replace than a masonry chimney.
A thorough chimney inspection will reveal the condition of your chimney, regardless if it’s masonry or stainless. NFPA 211 states to have your chimney inspected annually. If you’d have a chimney fire, definitely get your system inspected before you use it again. If your chimney has been out of service for any length of time, before using it, please get it inspected by a professional. You can rely on the expertise of a certified chimney professional to advise you on the condition of your chimney. You’ll sleep a lot better at night, too!
CHIMNEY CODE REQUIREMENTS
It bears repeating that the National Fire Protection Association code (NFPA 211) is for wood burning appliances and chimneys. Based in Quincy MA, this code is approved by the American National Standards Institute (ANSI). This organization brings together volunteers representing varied viewpoints and interests to achieve consensus on fire and other safety issues associated with the construction and installation of fireplaces, stoves and chimneys.
Manufacturers of stainless steel chimneys will have detailed directions regarding the safe installation of their products. By carefully following these instructions, all appropriate NFPA 211 codes will be met.
HOW HIGH SHOULD MY CHIMNEY BE?
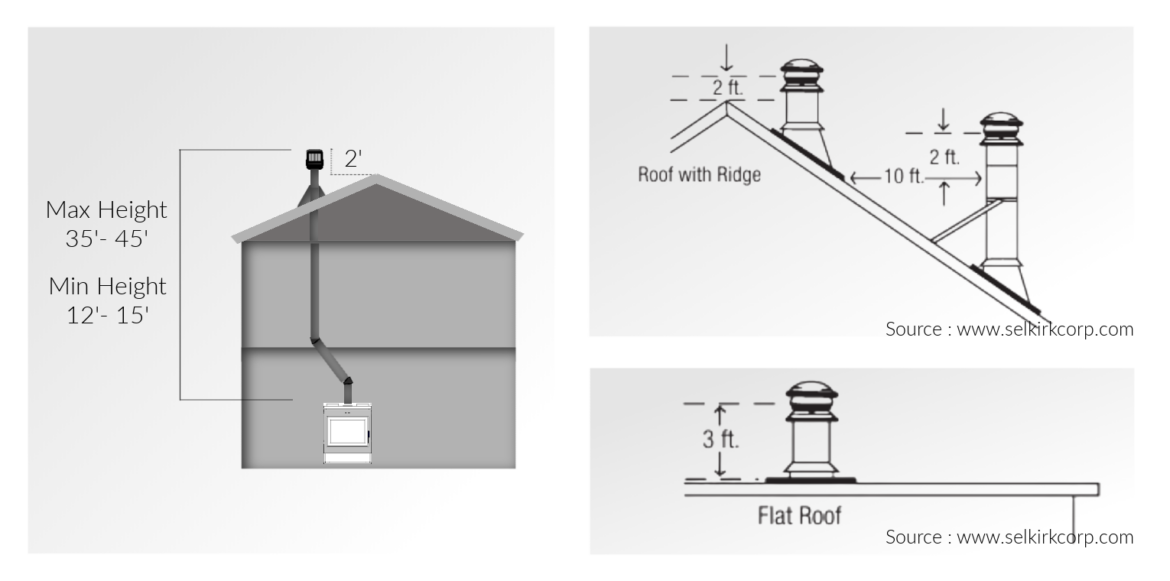
Chimneys must extend up above the roof. They cannot be horizontally vented through a sidewall like a direct vent gas fireplace. Even on a flat roof, the code requires at least 3 feet of chimney above the roof. Since most roofs are pitched, the code also states a chimney must be two feet higher than anything measured within 10 feet of it. [Insert a sketch of the 3’, 2’, 10’ rule, here.] Many think the code states the chimney needs to be three feet higher than the peak of the roof. Depending on where the chimney penetrates the roof and the roof pitch, that statement may or may not be completely accurate.
WHY WOULD I NEED A CHIMNEY FAN?
A chimney fan’s purpose is to help overcome a poor draft in your fireplace. It relies on electricity to function. The fan is mounted on the top of the chimney and assists the draft by moving an additional volume of air up the chimney. The fan helps to prevent smoke from backing up into the house. In negative air pressure scenarios or poor drafting situations, these types of fans may be beneficial. Whether it’s a masonry or a stainless steel chimney, an exhaust fan basically helps to remove smoke and fumes from the fireplace, by pulling more air through the chimney system. A situation where a chimney fan might be an option should be evaluated by a professional.
Incidentally, don’t get a chimney exhaust fan confused with a ventilation fan. A ventilation fan is designed to bring filtered, outside air into a building.
WHY IS MY CHIMNEY MAKING NOISE?
Why is my chimney humming? Answer: Because it doesn’t know the words! It may be a cute joke, but if you have a noisy chimney, it can be annoying and quite frustrating, and in some cases, seems to resonate throughout the entire house. Many noises from chimneys are the result of air flow. This might be from a strong wind or it might be from the draft in the chimney. Often described as a whistling or howling sound, this noise can be created if there’s an obstruction in the chimney or if the wind catches a loose or improper cap, storm collar or flashing. An ineffective or loose damper could be the culprit too.
Another fairly common reason of a noisy chimney is creosote building up then expanding when it’s heated. Over time, creosote can accumulate in the chimney and can become quite thick and sticky. If left to build-up, this can lead to an extremely dangerous fire hazard. The velocity of the draft in the chimney will also be affected. This can explain that rumbling or freight train train sound that many people describe just prior to a fire. Even with no fire in the fireplace, under certain conditions you may notice a noise with a downdraft of the wind.
Birds and nesting animals are another possibility of a noisy chimney. Usually, you’ll notice a scratching sound or some chirping or whining that would indicate critters of some sort.
Masonry chimney deteriorate from the inside out. Loose or missing mortar or damaged and missing flue tiles often assist in causing noisy chimneys. This can be the first step to other serious issues with your chimney.
So, what to do? The absolute best way to avoid noises coming from your chimney is through regular chimney cleaning and inspections, performed by a professional. Put your trust in an experienced certified chimney sweep. They have been specifically trained to evaluate and identify all sorts of chimney issues and recommend solutions. You’ll sleep better at night. Call now while you’re thinking about it.
I HAVE BIRDS OR RODENTS IN MY CHIMNEY, WHAT CAN I DO?
Given the opportunity, birds, raccoons, squirrels and bats can all call a chimney their home. If not removed, all can pose dangerous issues for a chimney. Nesting materials, feathers and fur from critters can easily cause an obstruction that can lead to smoke backing up or even a fire in your chimney. It can also hamper the velocity of the draft for your chimney and can actually cause permanent damage to your chimney if not removed. If you hear scratching, soft whining or chirping sounds, or notice unpleasant odors coming from the chimney or fireplace, it’s probably time to call in a professional.
We need to discuss one exception to removing unwelcome guests in your chimney, that is; chimney swifts. These birds are federally protected by law and must be dealt with differently than other intruders. Chimney swifts often seek out chimney type structures for building their nests during mating season. Instead of a typical nest in a tree, swifts build nests with small twigs that they attach to vertical surfaces (like a chimney) with their saliva. The bird has a small tube-like body with long tapered wings and is dark brown or dark grey. A fun fact about these birds: they cannot stand on their own feet! All feeding and drinking are done in-flight during the day. In fact, two parents and their little ones can eat as many as 12,000 flying insects such as gnats, mosquitos, flies, beetles, termites and ants, every day! They migrate annually to and from South America. Be forewarned, that if caught and convicted, destroying nesting chimney swifts can be very expensive. The nest must not be removed until they have permanently left the nest and migrated in the fall.
Having an animal living in your chimney is certainly unpleasant but it can also pose a serious health concern to everyone in the home. Pests in the chimney leave behind material that can cause a dangerous fire or may carry diseases that could be life threatening to human beings. People do not need to come into contact with the animal debris because the illness itself can be carried through the air.
A quick side bar here: The Center for Disease Control (CDC) in Atlanta says that homeowners can get histoplasmosis by breathing in the fungus from the air. This fungus is typically found in bird and bat droppings and in the soil. Activities that get the fungus airborne, like gardening or cleaning a very dirty chimney, can increase the risk of histoplasmosis. Dogs and cats can also get the disease, but it does not spread between pets and people or from person to person. The CDC says says the fungus that causes histoplasmosis can be found in most states and even around the globe. In the USA, it seems to be more prevalent in the eastern and central states, especially in the Mississippi and Ohio river valleys.
So, how do we keep critters out of a chimney? It’s a relatively easy fix. Make sure a properly sized chimney cap is securely installed. Many caps will have a spark arrestor or screen shield designed to keep sparks from popping out of the chimney and into low hanging trees or leaves and twigs on the roof. These screens can also be used to prevent birds from maneuvering through a cap and ending up in the chimney. However, these screens at times, have been known to collect creosote and restrict the airflow and velocity of the draft in the chimney. Many have found that putting on a spark arrestor screen in early spring, and removing it in November keeps critters out and won’t have concerns about creosote developing on the cap and screen. If you utilize a spark arrestor, be aware of this.
One last point, the damper obviously needs to be open when a fire is burning. Just be sure to keep it closed tight when the fireplace is not in use. You’ll keep more heat in and more critters out!
IN SUMMARY:
These items discussed above are not intended to be the final word and only things to keep in mind while burning wood. Rather, this article is meant to be a guideline and solid starting point to educate you on the importance of safe burning and maintenance practices, to inform you of considerations that you might not be aware of and to motivate you to learn more about the subject. A certified chimney professional is your ally. Utilize their expertise.
Burning wood is a wonderful way to become more independent and self sufficient, to save money and to be more environmentally conscious. But several important items to keep in mind, if left unchecked and neglected, can cause serious consequences. Remember to always install, operate and maintain your wood burning system according to all code and manufacturers requirements. ‘Good enough”… isn’t. There’s too much at risk.

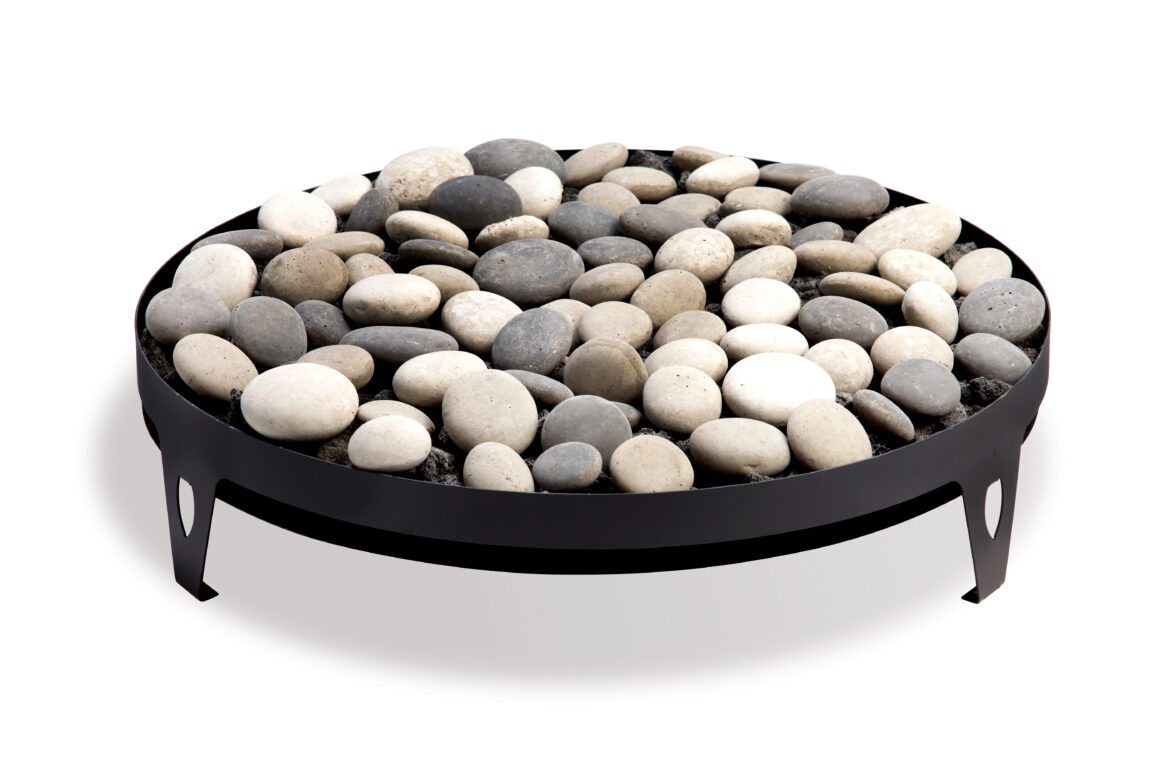 Barbara Jean FP2085with river rocks